2.1 – Introduction to chords and reading chord diagrams
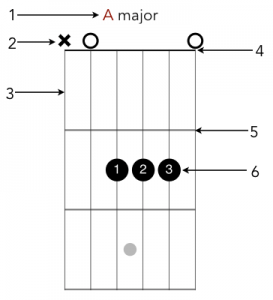
A chord is three or more notes played simultaneously. Chords make up the foundation on which a song is built and, given that there are so many combinations of notes, studying them is a never ending endeavour. We’re going to start with ‘open chords’, which use open strings as well as fretted strings. These open chords have been used widely in all styles of music and might sound familiar to you. Below is a labelled map of the fretboard which shows you how to hold an A major chord.
1- Name of the chord.
2 – The ‘X’ above the nut indicates that this string isn’t being used in this particular chord. You should mute any string marked X either with your thumb or another finger on your left hand. The ‘O’ above the nut indicates that this string should be played open – that is, let to ring out without fretting a note on it.
3 – The leftmost vertical line is the low E (thickest) string, so the next one to the right is the A string, then the D string, with the rightmost line being the high E (thinnest) string.
4 – This topmost horizontal line is the nut.
5 – The horizontal lines are the frets. The one singled out in the diagram is the first fret, the next one down is the second and so on. As we get further up the neck, the frets will be numbered on the left-hand side.
6 – These numbered black dots show you which of the fingers of your left hand go where. So, for this A Major chord, your first finger will press down on the third string down (the D string) behind the second fret, your second finger will do the same on the second fret of the fourth string (the G string) and your third finger will go on the second fret of the fifth string (the B string).1- Name of the chord.

